DIY Dominion/Card Game Travel Box
I posted a few years ago about a Dominion travel case. That post gets a lot of hits, so I thought I'd post about our updated travel case. This case we built was not an original idea. Our friends made one for themselves and showed us how to do it, so I'm going to show you guys. When I made this box, I made three at a time. I also took meticulous notes for a future blog post and then lost those notes somewhere in the last year. So here's what I remember.
I borrowed a colored printer to print them out. The document is 76 pages. Because you print on both sides, it ends up taking 38 sheets of paper.
I borrowed a laminating machine from another friend and laminated all the cards. This took some finesse and patience. This whole project takes patience.
The PDF has the cards sorted by Dominion set, but I re-sorted them alphabetically, because when you're pulling out cards for your game, it's easier to search through them alphabetically than jump from set-to-set.
Part 1: The Box
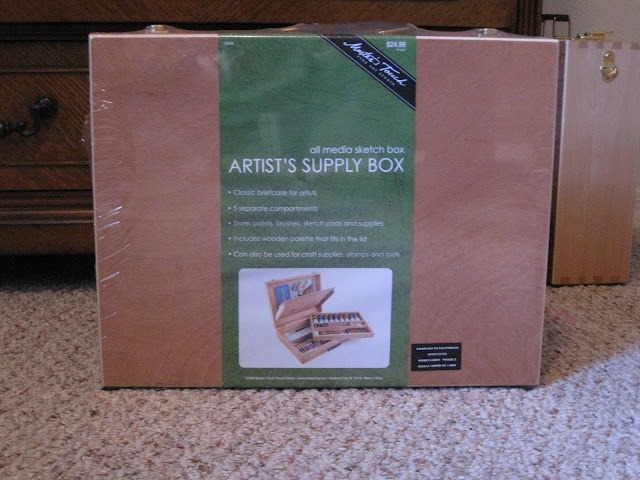
This box was sold at Hobby Lobby in 2014 for $24.99. I have no idea if they still sell it, or if there is anything like it out there now. It did not come with art supplies, just a box with a tray inside.
We removed the latches that came on the box, because they were not very tight. Our friends who told us how to do this project also replaced the latches, because they almost opened during transport.
We replaced them with more secure latches from Lowe's which were like $4.00 for a set of two.
We removed all the inner parts like the tray, and added sections with balsa wood and wood glue. We made four columns for cards and three rows for other game pieces. After the fact, I would have made my columns a teensy bit wider, because the cards fit very tightly.
Also, the balsa wood is very flimsy, and some of the game pieces are heavy (like the island mats). If I had more skills, time, and resources, I probably would have used heavier wood. However, the box is VERY heavy when it's filled, so using heavier wood would make it, well, even heavier.
Finally, we stapled two pieces of elastic into the top of the box. We cut out the top of our base set game box as a stiff flap, and all of the game instructions are stored behind it.
Part 2: Divider Filing Cards
The bulk of this project was making the divider cards. We got sumpfork's PDF file from our friends who got it from another person, etc. of every Dominion card in every current (through 2014) Dominion set. A quick google search took me to this page, so hopefully you can use this: http://domtabs.sandflea.org/I borrowed a colored printer to print them out. The document is 76 pages. Because you print on both sides, it ends up taking 38 sheets of paper.
I cut up all the cards with a paper cutter (pictured below) and laid them into laminating sheets. I found these 3 mil laminating sheets online for something like $13 for 100.
After I laminated, I used a paper-cutter to cut them all out. At first, I left a centimeter or so of laminate around the edges, but the box won't close properly if you do that, so just trim them up in the beginning and save yourself extra work.
Then I bound them in two stacks and put them in the boxes for gifts for my two brothers-in-law last Christmas. In this picture below the laminate is still too long on the top and bottom of the cards. I had to go back and trim it up later.
Here's a photo of our final box with Base, Alchemy, Seaside, and Prosperity:
We kept extra pieces of cardboard from our original game boxes to fold up and take up space so the cards don't move too much in transport. Also, you can see where our balsa wood bows in the columns because I didn't leave enough room between columns. And, our card dividers have not been trimmed, so they all have to lay back a little bit for the box to close properly.
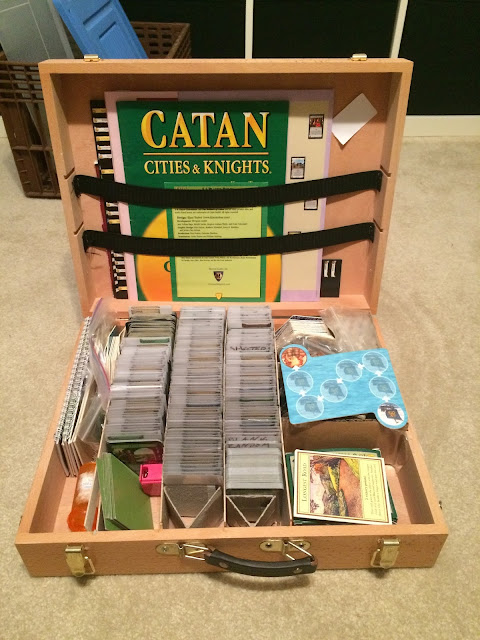
My brother-in-law uses his box for Settlers of Catan and Cities and Knights in addition to his Dominion games (Prosperity, Intrigue, Hinterlands, Cornucopia, Dark Ages, and Alchemy), so his box looks like this:
So neat and orderly!! His card dividers are trimmed (he trimmed them up himself), so his cards stand straight up. I made his box the same way I made ours, but his columns don't look like they're bowing as much, maybe because he has more cards.
The Cost
$15 - Box (40% off coupon on $25 regular price)
$4 - New Latches
$13 - Laminating Sheets for pack of 100
$6 - Balsa Wood
$5 - Elastic
$43 - Total for one
I made 3 at once. I used a 40% off coupon for the boxes, and since I used the elastic and laminating sheets for all three boxes, each box ended up being less than $30.
Hope this is helpful!


Comments